8.23.2013

Get the Look with Sleek MakeUP's Candy Collection

If you've been reading this blog for a while, you know I dove head-first into the beauty world in early Spring. A far-off land I'd successfully avoided for years! Then I spiraled out of control... While spiraling, I came across the UK brand Sleek MakeUP. In June they released their limited edition Candy Collection and I added everything to my cart and checked out before I even had my eyes opened for half an hour.

Sleek MakeUP Candy Collection Photo Sleek MakeUP Candy Collection Promo Photo

The look in their promo email was so pretty and out the norm for me, I knew I had to recreate it! And so...

Recreation of Sleek MakeUP Promo Photo Someone send me a modeling contract, STAT!

Sleek MakeUP Candy Collection Tutorial Sleek MakeUP Candy Collection Tutorial
Sleek MakeUP Candy Collection Tutorial - Eye OpenSleek MakeUP Candy Collection Tutorial - Eye Closed

All joking aside, Sleek MakeUP's Candy Collection is amazing. I'm so impressed with the quality of everything especially when you consider this is a UK drugstore brand! Let me briefly break it down before I tell you how to get this look:

Collection Photo
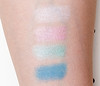
i-Candy i-Divine Palette: Not a single a chalky shade in this palette, they're all like butter with good pigmentation. They are lighter in application than in the pan, but can build easily (even more so over a cream base). As usual, you'll need to tap off any excess powder from your brush to prevent fallout, specifically with the matte shades. You're in luck because it's still available online!

Collection Photo
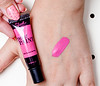
Lol-Lip-Pop Pout Paint: This surprised me with its cool tone, it leans way more lilac than it reads in the tube, when swatched on my arm, and in the promo photo. Honestly, I'll never wear it on its own because I don't think it suits me or my skin tone very well. On the plus side, the consistency is exactly like OCC's lip tars and they wear exactly the same for a fraction of the cost ($6.49). Lol-Lip-Pop has sold out but Sleek MakeUP sells eleven other awesome shades.

Collection PhotoSweet Cheeks Blush by 3: Cupcake, the cream blush used in this look, is the perfect dark pink with the slightest hint of purple, so basically fuchsia. It can be sheered out with a stippling brush or layered if you prefer to be a doll look-alike. Also still available online. By the way, buy all of their blushes. They are all perfect.

Products Used:
e.l.f. Eyelid Primer
NYX Jumbo Eye Pencil in Cottage Cheese
Sleek MakeUP i-Divine Palette in i-Candy
Physician's Formula Eye Booster 2-in-1 Lash Boosting Eyeliner + Serum in Ultra Black
Covergirl Clump Crusher Mascara
Maybelline Lash Discovery Mascara
e.l.f. Eyebrow Kit in Medium

Products Used

leek MakeUP Candy Collection Tutorial

Step 1: Apply shimmery white base (Cottage Cheese) onto eyelid with finger.
Step 2: Pat lilac shimmer on inner 1/2 of eyelid with an eyeshadow brush.
Step 3: Pat mint shimmer on outer 1/2 of eyelid with an eyeshadow brush.
Step 4: Apply matte blue to crease, build, and blend upward with a blending brush.
Step 5: Apply white shimmer as highlight to browbone and tear duct with finger.
Step 6: Bring white down to inner 1/2 of lower lash line with a pencil brush.
Step 7: Apply lilac shimmer to outer 1/2 of lower lash line with a pencil brush.
Step 8: Give yourself wings!

Hopefully you found this combo tutorial, review, and mini swatchfest useful! Let me know if you would like more swatches of the full i-Candy palette and Sweet Cheeks Blush by 3.

8.21.2013

NOTW: It's Jelly Time + New Nail Care Routine

It's been a minute since my last NOTW post! Let me tell you, I'm not sure if my affinity for cheap dollar store polish is the main culprit or what, but my nails were in shambles. They were thinning, peeling, and chipping at even the slightest of bumps. It got ugly. I decided to put away and, in some cases, toss out my usual products and let my nails take a breather.


Eliminating cuticle removers and gels and my giant gallon container of pure acetone from Home Depot has helped immensely. To clear my nail beds, I simply rub a slice of lemon or lime onto my cuticles and let the acidity soften them up. Then I gently push back with my nail to remove the dead cuticle bits rather than cut them. When I'm feeling fancy I'll also soak my nails in warm water and use a nail brush to remove any leftover debris. To be extra safe, I file my nails in one direction after applying a clear coat of polish. I'm not sure if all of this making a difference but I'd like to think it is, especially after making the switch to a better cuticle cream and non-acetone polish remover.


To only blame the products I was using seems unfair. There had to be some dietary things involved so I did a little digging and decided to add biotin to my daily vitamins in addition to drinking lots more water. I don't want to give out any recommendations because everyone's body is different but I really think the biotin has been working wonders for me. My nails are growing faster than I can keep up with and thankfully they're getting stronger. Bonus: My hair is too!

I've been easing my way back into partying with polish so I kept it simple with my first jelly sandwich!

Jelly Sandwich Nails

Have you tried this kind of manicure before? I really like the look of it but layering so many polishes to get the right effect is rough! It totally started to puff up a little after my fifth layer of jelly polish (2 jelly + 1 glitter + 2 jelly). Not the greatest and certainly won't be very long lasting, but it's still cute. Being the nerdy perfectionist I am I couldn't sweep the glitter on and had to place each hexagon with a toothpick.

Jelly Sandwich Nails

From left to right: L'Oreal in Bubble Trouble from their Miss Candy Collection and Milani Jewel FX in Hot Pink.

P.S. Can you tell I had the PBJT dancing banana in my head when I titled this post?

8.17.2013

THEY LIVE!

For those of you who follow me on Instagram, I'm sure you've gotten your fill of my propagating updates. I've been trying to keep my posts to a minimum so I don't inundate you, but I'm over here taking pictures every single day.

Propagating Succulents

My succulents have totally become my children and they're growing up so fast, you guys! But more importantly, they're still alive. Some even appear to be...flourishing? Some. The only cause for concern has been the August cool down that seemingly came out of nowhere. As much as I want to crack our windows open for the nice cool air, I don't want to harm the little guys while they're still so delicate. Makes me wish I'd known earlier in the year (/my life) about propagating succulents.

Propagating Succulents Propagating Succulents Propagating Succulents Propagating Succulents

The very first leaf cutting to sprout has grown so much in just a month's time. It's so cool to see the transformation from the tiny bud in my last plant post.

Propagating Succulents Propagating Succulents Propagating Succulents Propagating Succulents Propagating Succulents

A few of the leaf cuttings are growing leggy new plants which makes me sad. They're so thirsty for sun but my west and southwest facing window sills are all I got. Maybe I'll get super serious and buy a lamp.

Propagating Succulents

I've added to my mini window garden bit by bit without getting too ahead of myself, of course. If I'm going to kill some plants, I'd prefer to keep the casualty numbers as low as possible. All of these babies are from big box stores so chances are they'd end up overwatered/murdered anyway. Well, with the exception of THESE LITHOPS!

Lithops Lithops from Sprout Home Chicago

As much as I'd like to repot them, I'm hesitant so here they will remain until I find the courage. Maybe I shouldn't be so nervous since my Split Rock is doing surprisingly well after being repotted. Check out how much it has grown since that fateful night at Home Depot! I feel a new split coming soon. Can you see it forming already? Ah!

Split Rock Split Rock

It's definitely got some brown spots which haven't gotten worse since last month, but I don't know if I should be worried. Any Pleiospilos nelii aficionados out there?? Clue me in! Everyone else go get yourself some succulents!

8.13.2013

Get the Look with Meet Matt(e) Nude

theBalm's Meet Matt(e) Nude eyeshadow palette is the first all matte palette in my collection and let me tell you, it has set some pretty high standards for me! I wrote about this palette back in June after theBalm so kindly sent it to me and, as promised, here's a look I've created with it (finally). The color range is perfect and it has totally become my go-to palette for everyday wear.

theBalm Meet Matte Nude Tutorial - eyes open theBalm Meet Matte Nude Tutorial - eyes closed
theBalm Meet Matte Nude Tutorial - eye opentheBalm Meet Matte Nude Tutorial - eye closed

Although Matt Malloy (the cream shadow) can be a bit chalky, it still provides good coverage, you just have to be sure to tap off any excess from your brush to avoid fallout. Plus, how often are you really looking for stark white shadow anyway? It is easily buildable if that's your thing though! I absolutely love these eyeshadows. They really are super easy to work with.

Products Used:
Essence I ♥ Stage Eyeshadow Base
theBalm Meet Matt(e) Nude
Physician's Formula Eye Booster 2-in-1 Lash Boosting Eyeliner + Serum in Ultra Black
Covergirl Clump Crusher Mascara
Wet n Wild Color Icon Eyeliner Pencil in Bronzed
e.l.f. Eyebrow Kit in Medium

theBalm Meet Matte Nude Tutorial - makeup used

theBalm Meet Matte Nude Tutorial

Step 1: Pat cream (Matt Malloy) onto eyelid with an eyeshadow brush.
Step 2: Apply peach (Matt Singh) to outer crease and blend with a blending brush.
Step 3: Apply brown (Matt Rosen) to crease and blend with a crease brush.
Step 4: Apply navy (Matt Johnson) to crease and blend upward with a pencil brush.
Step 5: Apply cream (Matt Malloy) as highlight to browbone & tear duct with finger.
Step 6: Line lower lashline with bronze eyeliner, set with brown (Matt Rosen).
Step 7: Give yourself wings!

How do you feel about all matte looks? I was afraid they would appear flat and one-dimensional but I really dig them now! I think I'll add a pop of shimmer next time just for a little texture and contrast as my highlight.

Be sure to read my previous post on this palette if you'd like to see my swatches, it also covers theBalm's BalmJovi Rockstar Palette. And keep an eye out for when HauteLook offers theBalm again, they show up every couple of months or so and Meet Matt(e) Nude is usually 50% off!

UPDATE: theBalm is back on HauteLook today (6/20/14) through Monday (6/23/14) 8AM Pacific! Get this palette for 50% off - only $21!

8.06.2013

A Moment with Stila

By the grace of the makeup gods I stumbled upon a code for a site-wide 50% off sale on stilacosmetics.com thanks to Nouveau Cheap all the way back in April. Somehow the 50% off code was combined with an additional 40% off code during the checkout process and my entire purchase was 70% off. Did I just hear audible gasps?

Graphic of Stila Eyeshadow Palettes

Each of these $39 eyeshadow palettes were under $12 and that's just out of control. The code also threw in free shipping and a mascara sample for any order over $50, and a free full size blush for orders over $100. Since my total was just under the $50 mark, I added the Custom Color Blush in Coral which is normally $20 and got it for six bucks! That's the price of a NYX blush! Ah!! I'm gloating, I'm sorry.

I've been excited to play with these goodies but, as usual, I waited forever and then I waited some more. Surprisingly, I went for In The Moment first despite my usual aversion to purples (thanks to my super translucent skin). When you look at the palette though, only two out of ten shadows are true purples. Cue me getting over it, feeling experimental, and hoping I don't end up looking like a raccoon!

A look created with Stila's In The Moment eyeshadow palette
Close-up of a look created with Stila's In The Moment eyeshadow paletteClose-up of a look created with Stila's In The Moment eyeshadow palette

The eyeshadows are really nice! I've never owned any Stila products prior to this and I'm pleasantly surprised. They are a bit dry (not as buttery to the touch as, say, theBalm) but there's great color payoff and they blend well with very little effort. An extra bonus is the full size Smudge Stick Waterproof Eyeliner you get (normally $20 on its own). Each of these palettes are in Stila's permanent collection which is great because limited edition things have me so quick to panic about missing out!

Products Used:
Essence I ♥ Stage Eyeshadow Base
Maybelline Color Tattoo in Painted Purple
Stila In The Moment
Physician's Formula Eye Booster 2-in-1 Lash Boosting Eyeliner + Serum in Ultra Black
Stila Forever Your Curl Mascara
Rimmel Scandal Eyes Waterproof Kohl Eyeliner in Nude
e.l.f. Eyebrow Kit in Medium

Essence I ♥ Stage Eyeshadow Base, Maybelline Color Tattoo in Painted Purple
Stila In The Moment, Physician's Formula Eye Booster 2-in-1 Lash Boosting Eyeliner + Serum in Ultra Black, Stila Forever Your Curl Mascara, Rimmel Scandal Eyes Waterproof Kohl Eyeliner in Nude, e.l.f. Eyebrow Kit in Medium

Stila In The Moment Eyeshadow Palette Tutorial

Step 1: Apply purple base all over eyelid with finger.
Step 2: Pat violet (Glance) onto inner and outer eyelid with an eyeshadow brush.
Step 3: Pat rose gold (Wonder) onto center of eyelid with an eyeshadow brush.
Step 4: Pat gold (Spontaneous) onto center of rose gold (Wonder) with finger.
Step 5: Apply coppery-brown (Whim) to outer crease and with a blending brush.
Step 6: Apply dark purple (Improvise) to crease and blend with a crease brush.
Step 7: Apply cream (Desire) as highlight to browbone with finger.
Step 8: Line waterline with nude waterproof eyeliner.
Step 9: Give yourself wings!

Have you tried any of Stila's products? If so, what are your favorites? I'm pumped to try out In The Light next, or maybe In the Garden...

8.05.2013

05. Close Up

05. C L O S E U P: Mural at the Milwaukee County War Memorial.

8.04.2013

04. Love

04. L O V E: Muscles showing love the only way he knew how.

8.03.2013

03. Yellow

03. Y E L L O W: Bee pollinating neighbor's sunflowers.

8.02.2013

8.01.2013

The August Break 2013 & Breakfast


While scrolling through my Instagram feed this morning, someone I follow posted one of those daily photo prompts you can always find floating around online. This one in particular, from Susannah Conway, caught my attention.

The prompt appealed to me instantly because of the perfect combination of a twee color scheme and word "break," so I visited Susannah's blog and her spiel had me hooked in under a minute. Though I'll be participating this year, I won't actually be taking a break from blogging since my normal schedule consists of merely one post per week. Instead, this will be more of a fun supplement that will hopefully inspire some creativity in me.

01. B R E A K F A S T: Tiny propagating succulents getting their daily spritz.

I'll be posting photos daily on Instagram so feel free to follow me if you don't, and I'll post here whenever I don't have something scheduled. Let me know if you decide to participate, I'd love to check out your photos!